
https://velog.io/@danbibibi/KoBERT-fine-tuning-Sentiment-Analysis
https://www.notion.so/KoBERT-f7dff49a989c4b9cbdce46afc906c3c1
2021년경 KoBERT모델의 기존 서버가 닫히고 huginggace hub로 이전되었다.
아래는 hugingface로 구현하는 방법이다.
패키지 설치 및 라이브러리 불러오기
#필요 패키지 설치
!pip install mxnet
!pip install gluonnlp pandas tqdm
!pip install sentencepiece
!pip install transformers
!pip install torch
!pip install pandas
!pip install numpy==1.23.1필요한 패키지를 설치한다. 이때 numpy가 1.23.1 이상이면 import gluonnlp as nlp 오류가 발생하여 numpy버전을 따로 지정했다.
AttributeError: module 'numpy' has no attribute 'bool'.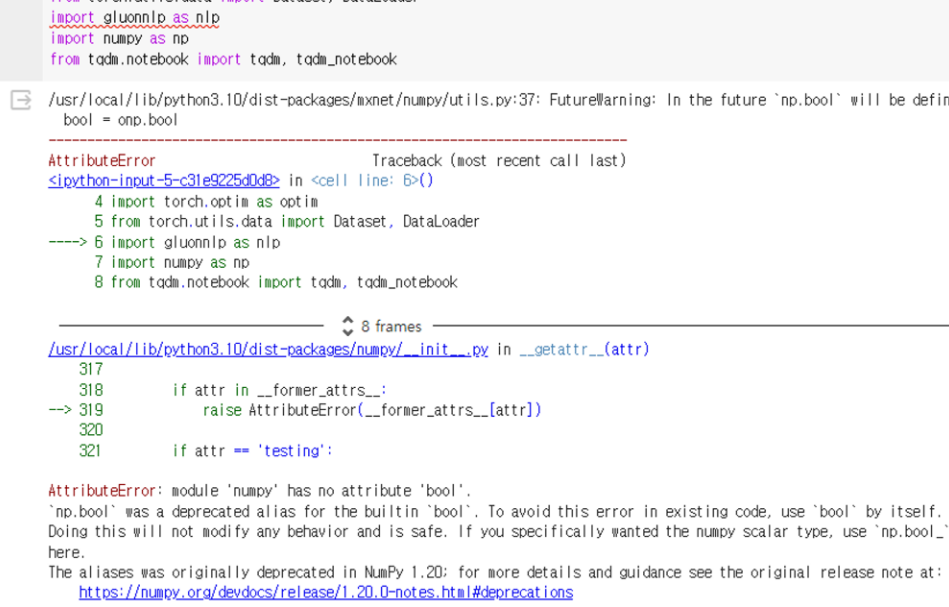
#kobert
!pip install 'git+https://github.com/SKTBrain/KoBERT.git#egg=kobert_tokenizer&subdirectory=kobert_hf'깃허브에서 kobert_tokenizer의 폴더를 다운받는다.
https://github.com/SKTBrain/KoBERT.git#egg=kobert_tokenizer&subdirectory=kobert_hf
GitHub - SKTBrain/KoBERT: Korean BERT pre-trained cased (KoBERT)
Korean BERT pre-trained cased (KoBERT). Contribute to SKTBrain/KoBERT development by creating an account on GitHub.
github.com
import torch
from torch import nn
import torch.nn.functional as F
import torch.optim as optim
from torch.utils.data import Dataset, DataLoader
import gluonnlp as nlp
import numpy as np
from tqdm import tqdm, tqdm_notebook
import pandas as pd설치 후 필요한 라이브러리를 import한다.
#  Hugging Face를 통한 모델 및 토크나이저 Import
from kobert_tokenizer import KoBERTTokenizer
from transformers import BertModel

from transformers import AdamW
from transformers.optimization import get_cosine_schedule_with_warmup#GPU 설정
device = torch.device("cuda:0")
데이터셋 준비
#데이터셋 로드
import pandas as pd
chatbot_data = pd.read_excel('/content/감성대화말뭉치(긍부정)_Training.xlsx')데이터셋을 가져온다.
# 데이터셋 라벨링
chatbot_data.loc[(chatbot_data['Emotion'] == "우울한"), 'Emotion'] = 0
chatbot_data.loc[(chatbot_data['Emotion'] == "기쁜"), 'Emotion'] = 1
chatbot_data.loc[(chatbot_data['Emotion'] == "화가 나는"), 'Emotion'] = 2
chatbot_data.loc[(chatbot_data['Emotion'] == "슬픈"), 'Emotion'] = 3
chatbot_data.loc[(chatbot_data['Emotion'] == "편안한"), 'Emotion'] = 4
chatbot_data.loc[(chatbot_data['Emotion'] == "걱정스러운"), 'Emotion'] = 5
chatbot_data.loc[(chatbot_data['Emotion'] == "신이 난"), 'Emotion'] = 6
chatbot_data.loc[(chatbot_data['Emotion'] == "충만한"), 'Emotion'] = 7
데이터셋에서 감정값을 숫자로 매핑하여 처리한다
(ex. 데이터프레임에서 'Emotion' 열 값이 '우울한'인 행을 선택하고, 해당 행의 'Emotion' 열 값을 0으로 변경.)
data_list = []
for q, label in zip(chatbot_data['Sentence'], chatbot_data['Emotion'])  :
    data = []
    data.append(q)
    data.append(str(label))

data_list.append(data)이후에 BERTDataset에 input으로 주기 위해서 문장(Sentence)과 감정라벨(Emotion)으로 이루어진 list를 data_list에 append해주었다.
Train 과 Test 데이터 분리
from sklearn.model_selection import train_test_split
dataset_train, dataset_test = train_test_split(data_list, test_size=0.25, random_state=0)

#print(len(dataset_train))
#print(len(dataset_test))train과 test data의 비율 4대 1로 설정하였다.
parameter setting
## Setting parameters
max_len = 64
batch_size = 64
warmup_ratio = 0.1
num_epochs = 5
max_grad_norm = 1
log_interval = 200
learning_rate = 5e-5사용할 parameter를 설정해준다. SKT에서 네이버 리뷰 분석에 사용한 parameter를 그대로 사용하였다.
BERTSentenceTransform 정의
BERTDataset부분에서 오류가 발생하여 추가한 코드이다.
BERTSentenceTransform.__init__() got an unexpected keyword argment 'vocab'
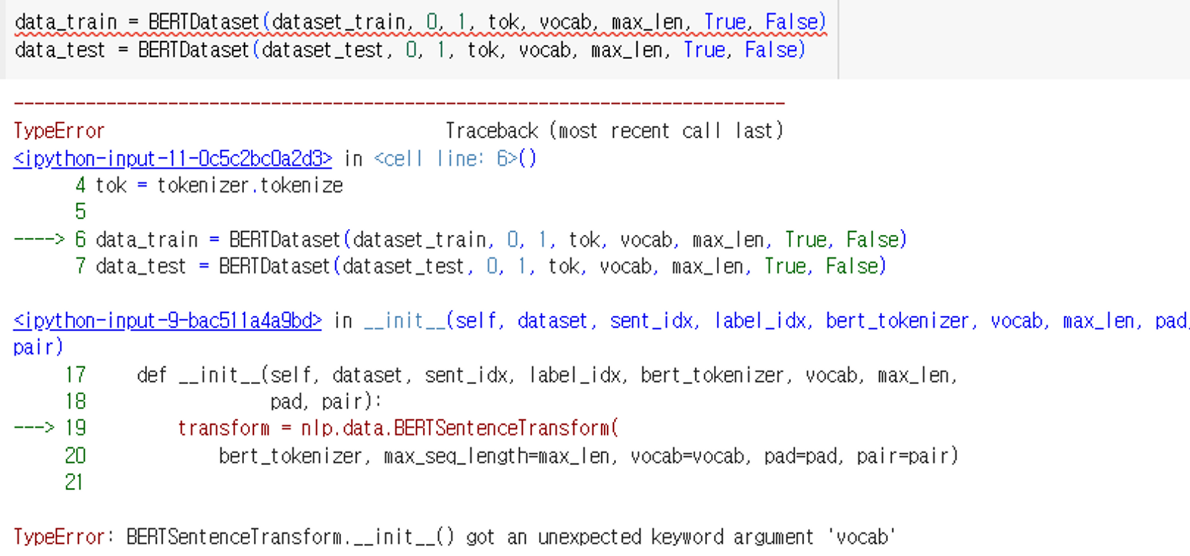
아래 블로그에 해결방법이 잘 나와있다!
https://blog.naver.com/newyearchive/223097878715
class BERTSentenceTransform:
    r"""BERT style data transformation.

    Parameters
    ----------
    tokenizer : BERTTokenizer.
        Tokenizer for the sentences.
    max_seq_length : int.
        Maximum sequence length of the sentences.
    pad : bool, default True
        Whether to pad the sentences to maximum length.
    pair : bool, default True
        Whether to transform sentences or sentence pairs.
    """

    def __init__(self, tokenizer, max_seq_length,vocab, pad=True, pair=True):
        self._tokenizer = tokenizer
        self._max_seq_length = max_seq_length
        self._pad = pad
        self._pair = pair
        self._vocab = vocab

    def __call__(self, line):
        """Perform transformation for sequence pairs or single sequences.

        The transformation is processed in the following steps:
        - tokenize the input sequences
        - insert [CLS], [SEP] as necessary
        - generate type ids to indicate whether a token belongs to the first
        sequence or the second sequence.
        - generate valid length

        For sequence pairs, the input is a tuple of 2 strings:
        text_a, text_b.

        Inputs:
            text_a: 'is this jacksonville ?'
            text_b: 'no it is not'
        Tokenization:
            text_a: 'is this jack ##son ##ville ?'
            text_b: 'no it is not .'
        Processed:
            tokens: '[CLS] is this jack ##son ##ville ? [SEP] no it is not . [SEP]'
            type_ids: 0     0  0    0    0     0       0 0     1  1  1  1   1 1
            valid_length: 14

        For single sequences, the input is a tuple of single string:
        text_a.

        Inputs:
            text_a: 'the dog is hairy .'
        Tokenization:
            text_a: 'the dog is hairy .'
        Processed:
            text_a: '[CLS] the dog is hairy . [SEP]'
            type_ids: 0     0   0   0  0     0 0
            valid_length: 7

        Parameters
        ----------
        line: tuple of str
            Input strings. For sequence pairs, the input is a tuple of 2 strings:
            (text_a, text_b). For single sequences, the input is a tuple of single
            string: (text_a,).

        Returns
        -------
        np.array: input token ids in 'int32', shape (batch_size, seq_length)
        np.array: valid length in 'int32', shape (batch_size,)
        np.array: input token type ids in 'int32', shape (batch_size, seq_length)

        """

        # convert to unicode
        text_a = line[0]
        if self._pair:
            assert len(line) == 2
            text_b = line[1]

        tokens_a = self._tokenizer.tokenize(text_a)
        tokens_b = None

        if self._pair:
            tokens_b = self._tokenizer(text_b)

        if tokens_b:
            # Modifies `tokens_a` and `tokens_b` in place so that the total
            # length is less than the specified length.
            # Account for [CLS], [SEP], [SEP] with "- 3"
            self._truncate_seq_pair(tokens_a, tokens_b,
                                    self._max_seq_length - 3)
        else:
            # Account for [CLS] and [SEP] with "- 2"
            if len(tokens_a) > self._max_seq_length - 2:
                tokens_a = tokens_a[0:(self._max_seq_length - 2)]

        # The embedding vectors for `type=0` and `type=1` were learned during
        # pre-training and are added to the wordpiece embedding vector
        # (and position vector). This is not *strictly* necessary since
        # the [SEP] token unambiguously separates the sequences, but it makes
        # it easier for the model to learn the concept of sequences.

        # For classification tasks, the first vector (corresponding to [CLS]) is
        # used as as the "sentence vector". Note that this only makes sense because
        # the entire model is fine-tuned.
        #vocab = self._tokenizer.vocab
        vocab = self._vocab
        tokens = []
        tokens.append(vocab.cls_token)
        tokens.extend(tokens_a)
        tokens.append(vocab.sep_token)
        segment_ids = [0] * len(tokens)

        if tokens_b:
            tokens.extend(tokens_b)
            tokens.append(vocab.sep_token)
            segment_ids.extend([1] * (len(tokens) - len(segment_ids)))

        input_ids = self._tokenizer.convert_tokens_to_ids(tokens)

        # The valid length of sentences. Only real  tokens are attended to.
        valid_length = len(input_ids)

        if self._pad:
            # Zero-pad up to the sequence length.
            padding_length = self._max_seq_length - valid_length
            # use padding tokens for the rest
            input_ids.extend([vocab[vocab.padding_token]] * padding_length)
            segment_ids.extend([0] * padding_length)

        return np.array(input_ids, dtype='int32'), np.array(valid_length, dtype='int32'),\
np.array(segment_ids, dtype='int32')BERTSentenceTransform는 BERT 스타일의 데이터 변환을 수행하는 클래스이다. 이 클래스는 BERT 모델에 입력되는 데이터를 준비하는 데 사용된다. 즉 BERT 모델에 입력되는 문장 또는 문장 쌍을 적절한 형식으로 변환하여 모델이 이해할 수 있도록 한다.
- 초기화: __init__ 메서드에서는 입력으로 받은 tokenizer, 최대 시퀀스 길이, vocab, pad 및 pair를 설정.
- 데이터 변환: __call__ 메서드에서는 입력된 문장 또는 문장 쌍을 BERT 모델이 사용할 수 있는 형식으로 변환. 이 변환 과정은 아래 일련의 단계를 따른다:
- 문장 토크나이징.
- [CLS] 및 [SEP] 토큰을 삽입하여 문장의 시작과 끝을 나타냄.
- segment_ids를 생성. (문장이 첫번째 시퀀스인지 두번째 시퀀스인지 나타냄)
- 토큰을 정수로 변환.
- 필요한 경우 패딩을 추가하여 시퀀스 길이를 맞춤.
Dataset정의 및 데이터 변환
주어진 데이터셋을 KoBERT 모델에 입력으로 사용할 수 있는 형식으로 변환하고, 이를 토대로 텍스트 분류 작업을 수행할 수 있도록 한다.
from kobert_tokenizer import KoBERTTokenizer
from transformers import BertModel
from transformers import AdamW
from transformers.optimization import get_cosine_schedule_with_warmup

class BERTDataset(Dataset):
    def __init__(self, dataset, sent_idx, label_idx, bert_tokenizer, vocab, max_len,
                 pad, pair):
        transform = BERTSentenceTransform(bert_tokenizer, max_seq_length=max_len,vocab=vocab, pad=pad, pair=pair)
        #transform = nlp.data.BERTSentenceTransform(
        #    tokenizer, max_seq_length=max_len, pad=pad, pair=pair)
        self.sentences = [transform([i[sent_idx]]) for i in dataset]
        self.labels = [np.int32(i[label_idx]) for i in dataset]

    def __getitem__(self, i):
        return (self.sentences[i] + (self.labels[i], ))

    def __len__(self):
        return (len(self.labels))

tokenizer = KoBERTTokenizer.from_pretrained('skt/kobert-base-v1')
bertmodel = BertModel.from_pretrained('skt/kobert-base-v1', return_dict=False)
vocab = nlp.vocab.BERTVocab.from_sentencepiece(tokenizer.vocab_file, padding_token='[PAD]')


data_train = BERTDataset(dataset_train, 0, 1, tokenizer, vocab, max_len, True, False)
data_test = BERTDataset(dataset_test, 0, 1, tokenizer, vocab, max_len, True, False)코드의 흐름은 아래와 같다
1. KoBERTTokenizer를 사용하여 한국어 BERT용 토크나이저와 BertModel을 사용하여 사전 학습된 KoBERT 모델을 불러 온다.
2. nlp.vocab.BERTVocab.from_sentencepiece()를 사용하여 BERT 모델의 어휘를 불러온다.
3. 학습 및 테스트 데이터셋을 BERTDataset 클래스를 사용하여 준비한다. 데이터셋은 문장과 레이블로 이루어져 있으며, 각각의 문장은 토큰화되고 어휘에 따라 숫자로 인덱싱된다.
train_dataloader = torch.utils.data.DataLoader(data_train, batch_size=batch_size, num_workers=5)
test_dataloader = torch.utils.data.DataLoader(data_test, batch_size=batch_size, num_workers=5)DataLoader을 만든다!
KoBERT model 정의
주어진 텍스트에 대한 임베딩을 BERT 모델을 통해 얻고, 이를 활용하여 해당 텍스트의 클래스를 예측하는 분류 모델을 정의하는 부분이다.
class BERTClassifier(nn.Module):
    def __init__(self,
                 bert,
                 hidden_size = 768,
                 num_classes=8,
                 dr_rate=None,
                 params=None):
        super(BERTClassifier, self).__init__()
        self.bert = bert
        self.dr_rate = dr_rate

        self.classifier = nn.Linear(hidden_size , num_classes)
        if dr_rate:
            self.dropout = nn.Dropout(p=dr_rate)

    def gen_attention_mask(self, token_ids, valid_length):
        attention_mask = torch.zeros_like(token_ids)
        for i, v in enumerate(valid_length):
            attention_mask[i][:v] = 1
        return attention_mask.float()

    def forward(self, token_ids, valid_length, segment_ids):
        attention_mask = self.gen_attention_mask(token_ids, valid_length)

        _, pooler = self.bert(input_ids = token_ids, token_type_ids = segment_ids.long(), attention_mask = attention_mask.float().to(token_ids.device))
        if self.dr_rate:
            out = self.dropout(pooler)
return self.classifier(out)사용된 주요 구성 요소는 아래를 참고하면된다.:
- __init__ 메서드: 클래스의 초기화. 이 메서드에서는 BERT 모델과 분류를 위한 선형 레이어 등의 구성 요소들을 정의한다. 인자로는 BERT 모델(bert), 은닉 크기(hidden_size), 클래스의 개수(num_classes), 드롭아웃 비율(dr_rate), 그리고 추가적인 매개변수(params)이다.
- gen_attention_mask 메서드: 어텐션 마스크를 생성한다. 이 함수는 입력으로 받은 토큰 IDs와 유효 길이를 바탕으로 어텐션 마스크를 생성한다.
- forward 메서드: forward 연산을 정의한다. 이 메서드에서는 BERT 모델에 입력을 주어서 얻은 출력을 바탕으로 분류를 수행한다.
gen_attention_mask를 사용하여 어텐션 마스크를 생성하고, 이를 BERT 모델에 입력으로 전달하여 얻은 출력 중에서 [CLS] 토큰에 해당하는 풀링된 벡터를 가져온다. 그리고 이를 선형 레이어를 통해 각 클래스에 대한 로짓값을 얻는다. (드롭아웃이 설정되어 있다면, 풀링된 벡터에 드롭아웃을 적용.)
모델 사용하기
본격적으로 모델을 학습하기 위한 준비를 한다.
#정의한 모델 불러오기
model = BERTClassifier(bertmodel,  dr_rate=0.5).to(device)
#model = BERTClassifier(bertmodel,  dr_rate=0.5).to('cpu')

# Prepare optimizer and schedule (linear warmup and decay)
no_decay = ['bias', 'LayerNorm.weight']
optimizer_grouped_parameters = [
    {'params': [p for n, p in model.named_parameters() if not any(nd in n for nd in no_decay)], 'weight_decay': 0.01},
    {'params': [p for n, p in model.named_parameters() if any(nd in n for nd in no_decay)], 'weight_decay': 0.0}
]
optimizer = AdamW(optimizer_grouped_parameters, lr=learning_rate)
loss_fn = nn.CrossEntropyLoss()
t_total = len(train_dataloader) * num_epochs
warmup_step = int(t_total * warmup_ratio)
scheduler = get_cosine_schedule_with_warmup(optimizer, num_warmup_steps=warmup_step, num_training_steps=t_total)
def calc_accuracy(X,Y):
    max_vals, max_indices = torch.max(X, 1)
    train_acc = (max_indices == Y).sum().data.cpu().numpy()/max_indices.size()[0]
    return train_acc
train_dataloader
- model = BERTClassifier(bertmodel, dr_rate=0.5).to(device): 앞서 정의한 BERTClassifier 클래스를 사용하여 모델을 초기화
- Optimizer와 Schedule 설정:
- no_decay: 가중치 감쇠를 적용하지 않을 파라미터들을 나타내는 리스트.
- optimizer_grouped_parameters: 옵티마이저에 전달될 파라미터들을 설정. 가중치 감쇠를 적용할 파라미터와 그렇지 않을 파라미터를 분류하여 설정.
- optimizer: AdamW 옵티마이저를 설정합니다. 가중치 감쇠를 적용하는 그룹과 그렇지 않은 그룹으로 파라미터들을 나누어 설정.
- loss_fn: 손실 함수로, 크로스 엔트로피 손실을 사용.
- t_total: 전체 학습 스텝 수입니다. (len(train_dataloader) * num_epochs로 계산.)
- warmup_step: 학습률을 선형적으로 증가시킬 웜업 스텝 수. 총 학습 스텝의 일정 비율(warmup_ratio)이 웜업 스텝으로 설정.
- scheduler: 코사인 스케줄러를 이용하여 학습률을 조절. 웜업 스텝 후 코사인 함수를 이용하여 학습률을 감소.
- calc_accuracy 함수: 정확도를 계산하는 함수. 모델의 출력과 실제 레이블을 비교하여 정확도를 계산.
- train_dataloader: 위에서 만든 학습 데이터.
모델 학습및 평가
for e in range(num_epochs):
    train_acc = 0.0
    test_acc = 0.0
    model.train()
    for batch_id, (token_ids, valid_length, segment_ids, label) in enumerate(tqdm_notebook(train_dataloader)):
        optimizer.zero_grad()
        token_ids = token_ids.long().to(device)
        segment_ids = segment_ids.long().to(device)
        valid_length= valid_length
        label = label.long().to(device)
        out = model(token_ids, valid_length, segment_ids)
        loss = loss_fn(out, label)
        loss.backward()
        torch.nn.utils.clip_grad_norm_(model.parameters(), max_grad_norm)
        optimizer.step()
        scheduler.step()  # Update learning rate schedule
        train_acc += calc_accuracy(out, label)
        if batch_id % log_interval == 0:
            print("epoch {} batch id {} loss {} train acc {}".format(e+1, batch_id+1, loss.data.cpu().numpy(), train_acc / (batch_id+1)))
    print("epoch {} train acc {}".format(e+1, train_acc / (batch_id+1)))

    model.eval()
    for batch_id, (token_ids, valid_length, segment_ids, label) in enumerate(tqdm_notebook(test_dataloader)):
        token_ids = token_ids.long().to(device)
        segment_ids = segment_ids.long().to(device)
        valid_length= valid_length
        label = label.long().to(device)
        out = model(token_ids, valid_length, segment_ids)
        test_acc += calc_accuracy(out, label)
    print("epoch {} test acc {}".format(e+1, test_acc / (batch_id+1)))
모델 훈련 부분은 다음과 같다.
for e in range(num_epochs): 주어진 epoch 수만큼 반복.
model.train(): 모델을 학습 모드로 설정.
for batch_id, (token_ids, valid_length, segment_ids, label) in enumerate(tqdm_notebook(train_dataloader)): 학습 데이터셋을 불러오고 반복문을 통해 각 배치에 대한 학습을 진행.
- optimizer.zero_grad(): 옵티마이저의 그래디언트를 초기화.
- 데이터를 GPU로 전송.
- 모델에 데이터를 입력으로 전달하여 출력을 얻음.
- 손실을 계산.
- 역전파를 수행하고 그래디언트 클리핑을 적용.
- 옵티마이저를 통해 파라미터를 업데이트
- 스케줄러를 통해 학습률을 업데이트.
- 정확도 계산.
- 현재의 학습 상태를 출력.( 일정 간격마다 )
모델 평가부분은 다음과 같다.
model.eval(): 모델을 평가 모드로 변경.
for batch_id, (token_ids, valid_length, segment_ids, label) in enumerate(tqdm_notebook(test_dataloader)): 테스트 데이터셋을 불러오고 반복문을 통해 각 배치에 대한 평가를 진행.
- 데이터를 GPU로 전송.
- 모델에 데이터를 입력으로 전달하여 출력을 얻기.
- 정확도 계산.
- 각 epoch마다 학습 데이터셋과 테스트 데이터셋에 대한 정확도를 출력.
test코드
#토큰화
tokenizer = KoBERTTokenizer.from_pretrained('skt/kobert-base-v1')
#tok = tokenizer.tokenize

def predict(predict_sentence):

    data = [predict_sentence, '0']
    dataset_another = [data]

    another_test = BERTDataset(dataset_another, 0, 1, tokenizer, vocab, max_len, True, False)
    test_dataloader = torch.utils.data.DataLoader(another_test, batch_size=batch_size, num_workers=5)

    model.eval()

    for batch_id, (token_ids, valid_length, segment_ids, label) in enumerate(test_dataloader):
        token_ids = token_ids.long().to(device)
        segment_ids = segment_ids.long().to(device)

        valid_length= valid_length
        label = label.long().to(device)

        out = model (token_ids, valid_length, segment_ids)

        test_eval=[]
        for i in out:
            logits=i
            logits = logits.detach().cpu().numpy()

            # if np.argmax(logits) == 0:
            #     test_eval.append("공포가")
            # elif np.argmax(logits) == 1:
            #     test_eval.append("놀람이")
            # elif np.argmax(logits) == 2:
            #     test_eval.append("분노가")
            # elif np.argmax(logits) == 3:
            #     test_eval.append("슬픔이")
            # elif np.argmax(logits) == 4:
            #     test_eval.append("중립이")
            # elif np.argmax(logits) == 5:
            #     test_eval.append("행복이")
            # elif np.argmax(logits) == 6:
            #     test_eval.append("혐오가")

            if np.argmax(logits) == 0:
                test_eval.append("우울한")
            elif np.argmax(logits) == 1:
                test_eval.append("기쁜")
            elif np.argmax(logits) == 2:
                test_eval.append("화가 나는")
            elif np.argmax(logits) == 3:
                test_eval.append("슬픈")
            elif np.argmax(logits) == 4:
                test_eval.append("편안한")
            elif np.argmax(logits) == 5:
                test_eval.append("걱정스러운")
            elif np.argmax(logits) == 6:
                test_eval.append("신이 난")
            elif np.argmax(logits) == 7:
                test_eval.append("충만한")

        print(test_eval[0] + " 하루를 보냈네요.")
#질문 무한반복하기! 0 입력시 종료
end = 1
while end == 1 :
    sentence = input("하고싶은 말을 입력해주세요 : ")
    if sentence == 0 :
        break
    predict(sentence)
    print("\n")
더 공부하는 중..
kobert의 단점 : Vocab size 적음 (8002개)
Kobert 경량화 https://github.com/monologg/DistilKoBERT
'AI' 카테고리의 다른 글
| kobert fine tuning 모델 저장 / 불러와서 사용하기 (0) | 2024.05.07 |
|---|---|
| 생성형 인공지능 이미지 생성 GAN, diffusion (0) | 2024.05.04 |
| BERT, KoBERT 자연어 처리 모델 (0) | 2024.04.02 |
| Fashion MNIST (0) | 2022.12.11 |
| CNN을 이용한 Caltech 101 영상 분류 (0) | 2022.12.09 |